Adding More Courses
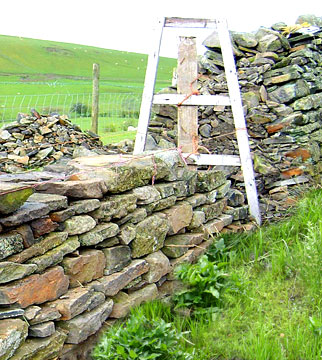
The wall is built one course or layer at a time for its whole length. If it is a particularly long wall, you may be able to build it in a number of shorter sections, particularly if you intend to incorporate access gaps or gateways. However to maintain maximum structural integrity it is best to treat the whole length of wall as a single unit. As each layer is completed, the lines between the two "A" frames are moved upward to help in aligning the next layer.
When selecting stones for each layer, you should view the project almost like a jigsaw. The underlying layer is not going to be perfectly flat. In fact too much uniformity is likely to detract from the overall visual effect of the wall. Consequently, you should be looking for stones that "fit" or interlock with the underlying layer use thicker stones where the underlying layer is higher and thinner stones where the underlying layer is lower.
Each subsequent layer or course needs to be stepped inward relative to the underlying layer, using the lines between the "A" frames for guidance.. Also select stones so that they span gaps (joins) between the stones in the underlying layer. This is much like the principle of bricklaying where each layer of brick is offset by half a brick from the layer below and the layer above. In the case of dry stone walls, however, the offset is not nearly so precise.
In fact, in some situations such as when a stone is incorporated that is twice or possibly more times the typical height of adjacent stones it is simply not possible to span the gaps until you have built up the rest of the wall to the height of the thickest stone. It is important to appreciate, however, that much of the strength of the wall is derived from this interlocking style of build.
Tying Everything Together

From time to time you must also incorporate additional tie stones or bonding stones to lock together the two thinner structures that make up the final dry stone wall. Spacing of the tie stones is not all that critical but as a rough guide, they should be incorporate every three or four feet or thereabouts. Also continue to use smaller stones to prevent the larger stones from moving and to help in aligning them to the correct angle. The gap between the two side walls is also filled with rubble one course at a time.
At every stage of construction it is important to pack the stones together as tightly as possible. As a general rule, the fewer gaps, the stronger will be the finished wall.
This rule is as important when building the middle of the wall as it is for the outsides, if not more so. It is the interlocking nature of the stones that prevents movement and gives strength. For this reason, the temptation to simply "shovel" in small stones should be resisted since this can result in substantial voids or pockets in the heart of the wall. As this material settles over time, this will result in loose stones that are easily dislodged.
You will need to incorporate tie stones or bonding stones into the ends of the wall. If it is intended that traffic of one form or another is to pass at the ends, they will be subject to most wear and knocks and must, therefore, be built strong.
If they are intended to form part of a gateway, then it would be as well to incorporate a gate post, which could be wood or metal but ideally would be made of stone. However, it must be appreciated that such stone structures are extremely heavy and difficult to manoeuvre into the correct position.
Whatever form the ends of the wall take, it is important that they be straight and vertical and should be checked frequently with the plumb line and/or spirit level.
Read more about Dry Stone Walling |
Read about more Gardening Techniques |
